
Instagram’s favorite Ikea greenhouse hack with a little extra.
If you’re a big indoor plant nut or enjoy looking through epic plant shelfies on Instagram, you might be familiar with the Ikea Milsbo Greenhouse. People have been buying up both the tall and wide versions of the Milsbo cabinet as fast as Ikea can produce them in order to maintain and display their beautiful tropical plant collections.
The Milsbo greenhouse has become wildly popular for a few reasons:
- It’s design is modern, simple, and sleek.
- It’s extremely affordable. Only $249.99!
- It’s “easy” to convert to a greenhouse.
- It’s made of metal and doesn’t mind humidity.
This last point was of particular interest to us when we decided we were going to kick the Ikea Milsbo Greenhouse up a notch. Instead of just using it as a greenhouse, we hacked the Ikea Milsbo into a soilless hydroponic garden!
How to turn the Ikea Milsbo into a Hydroponic Greenhouse
During the design phase of our Ikea Milsbo hydroponic hack, one of the driving design conditions we gave ourselves was to make sure that the hydroponic system could be converted back to a standard Milsbo greenhouse at any point. We wanted to make sure that the hydroponic system was a few added steps to the greenhouse hack and didn’t do anything to irreversibly change the Milsbo.
Because of this, we’re going to split this guide into two separate parts; a progression from standard Milsbo cabinet → Milsbo Greenhouse and then a part II to go from Milsbo Greenhouse → Hydroponic Milsbo. You can follow along in order to turn your Ikea Milsbo cabinet into a Milsbo greenhouse then choose whether or not to continue into a hydroponic setup.
There are some steps that we’ll complete in Part I for the hydroponic addition since they’re easier to complete now rather than later. Everything in this guide written in green text is only required if you want to build the hydroponic version. If you’re only interested in the greenhouse version, you can ignore these materials and steps and still follow along with this guide to build a standard Milsbo greenhouse. We’ll make a clear distinction in the construction instructions if you plan to only follow along for the greenhouse build so you’re not doing unnecessary work.
Below is a materials list. This is everything you’ll need to convert your Milsbo tall into a Milsbo Greenhouse. Some of these items may be cheaper in local stores such as Lowes or Home Depot, but we added links to products on Amazon to keep as much of it in one place as we could. Even if you don’t purchase through Amazon, at least you’ll have a visual on what you should be looking for.
If you want to see everything together with prices, the Amazon Wishlist for all of the GREENHOUSE ONLY items can be found here. (Excluding the cabinet itself which can only be purchased from Ikea). A separate list will be added here and in Part II when it’s together.
- Ikea Milsbo Cabinet (Black or White)
- Tools:
- Wire Shelving
- Rubber Wire Shelf Caps
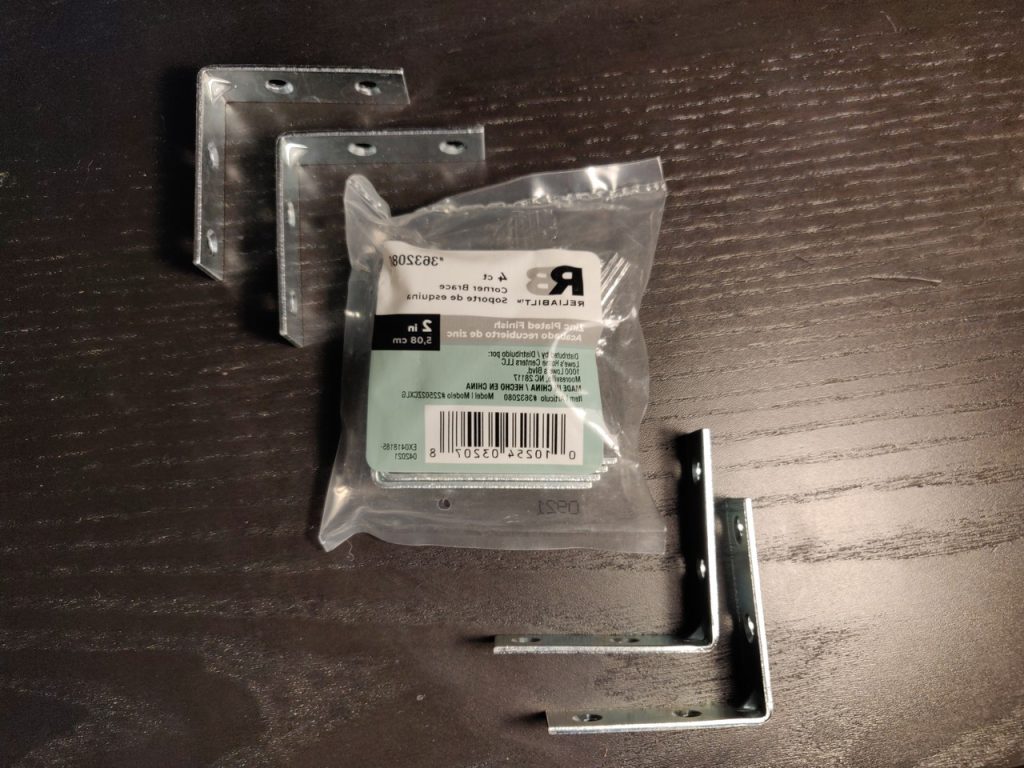
- 2″ Corner Brackets
- Desk Grommet (Electrical Safety Requirement!)
- Magnetic Hooks
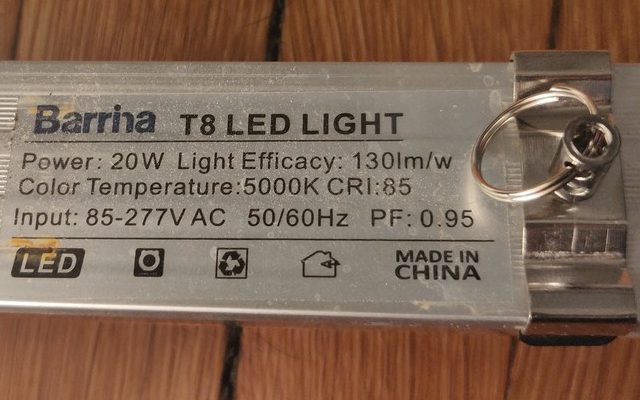
- T8 Barrina Grow Lights
- Smart Power Strip
- Mini-Humidifier
- Humidity Sensor
- 1/4″ self adhesive weather stripping
- Silicone weather strip tape
- Non-clear Water Tight Containers (with Lids!)
- 1/2″ Poly Piping
- Plastic Thru-bulkhead Connectors
- 90° Irrigation Elbow
- Rubber Washers
- Net Pots
- Roxwool
- Water Pump
- Air Pump (with air stones)
Step 1: Assemble the Cabinet
Ikea’s secret to sell high quality furniture at low prices is that they outsource a majority of their labor at the very low cost of $0; directly to you! Anyone’s who has put together Ikea furniture can attest to these three facts:
- There WILL be extra pieces.
- It WILL take twice as long as you expect.
- At LEAST one piece will be upside down.
On a more serious note, the Ikea Milsbo is actually one of the easier pieces of furniture Ikea sells to assemble. Since the bulk of the structure is metal, most of the connections are bolts that fit into pre-drilled holes. There’s no screws, particleboard, or wooden pegs that you have to deal with like some of their other pieces. It makes the cabinet feel more like an erector set than building a rocket ship. With that said, there are a few things worth mentioning for putting together your new Milsbo.
The first point to note is that you’ll definitely want a second person for a couple of the steps. Even though Ikea’s instruction to use two people can largely be ignored, the Milsbo is an exception. As you can see in the photo above, all four sides of the cabinet are large single sheets of glass. The sequencing of install for the cabinet means that there’s a point in time that you’ll need to stand the glass upright and hold it in place while you fasten it. It makes it significantly easier (and safer) to have a second person hold the glass in place while you’re making the connections and reduces the chance of damaging your greenhouse. Once you have one or two of the pieces of glass in place you can likely do it yourself, but be careful.
The second thing worth noting is that you can completely ignore the glass shelves. Since we’ll be replacing these with wire anyway, there’s no reason to remove the protection off of the glass and risk damaging them or your cabinet. This is true for both the Milsbo Greenhouse and the Hydroponic Milsbo.
Lastly, there’s a single package of fasteners and a lot of small black screws. There are, however, a couple of screws that are slightly larger than the others. Make sure to set these larger screws aside before you start building the cabinet. If you accidentally use one of the larger screws in place of the smaller ones that hold the glass in place, it’s a federal project to figure out where you used it when you need it later on and you’ll waste a lot of time undoing your hard work.
Step 2: Drill the Hole(s)
This hole we’re going to drill in one of the back corners of the Milsbo is where the wires for the internal components of the greenhouse will run. We’ll call this Hole 1 for future steps. For the hydroponic system, we’ll still need this hole, but we’ll use it for the main water feed instead of for wires.
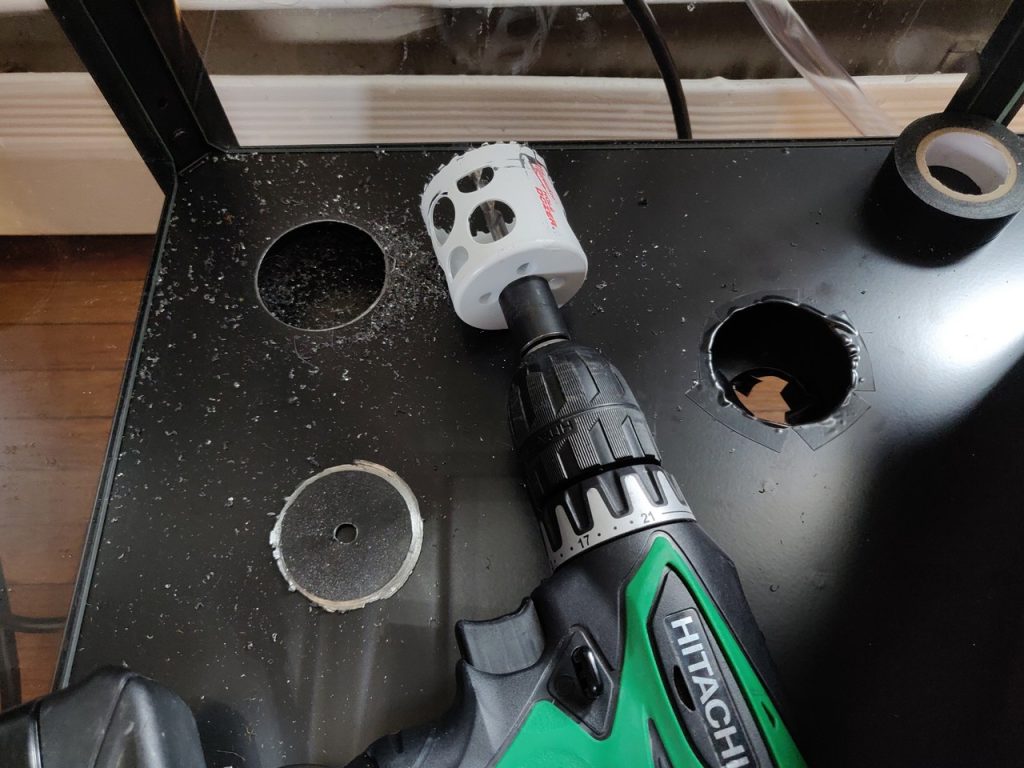
**The adjacent hole towards the middle of the cabinet is for hydroponics only and can be ignored for the greenhouse build. If you are building the hydroponic system, you need to drill two extra holes for a total of three penetrations. The one shown in the middle of the cabinet is for the hydroponic drain piping (Hole 2) and the third one you need is need is for wiring (Hole 3). In our build, Hole 3 is in the top of the cabinet in the back left corner. We chose to run our wires up the back and outside the cabinet instead of through it. You can do choose either option, but you will need a total of three holes.**
Some guides online for constructing the Milsbo greenhouse recommend cutting the hole in the base at different times during the construction. We prefer completely building the cabinet then drilling the hole after, but you can drill your hole as soon as the legs are built if you prefer or even right out of the package.
The drilling step is the one that typically makes people the most uncomfortable. Drilling through metal isn’t an every day occurrence and is different than drilling a hole through wood. The trick here is to use a decent hole saw and to take your time. Getting a clean hole through the cabinet base is not a quick process. You’re not going to power through it like you do with wood and rushing it will do nothing but burn out your drill or mess up your hole. If you’re using a cordless drill, make sure the battery is charged before you start and/or have a spare on hand.
Note: Please use eye protection and potentially a mask. You're spinning a sharp piece of metal against another piece of metal and protecting yourself against small pieces that fly off is important.
Note: Place a towel, piece of cardboard, carpet scrap, etc. below the cabinet base when you're drilling. There will be metal dust/pieces and they're a pain to try and get off of a floor, especially a carpet.
The 2″ hole saw that we used is slightly larger than necessary, but you’ll need this size to cut holes for your netpots anyway so we decided to keep the holes consistent. It doesn’t hurt to have the larger opening regardless as it provides more room and makes it easier when you’re trying to run multiple wires or piping through it. Keep in mind, the metal base has two layers of thin metal with an air gap between and you’ll technically need to drill two holes in the same spot to get all the way through. Remember, patience is key!
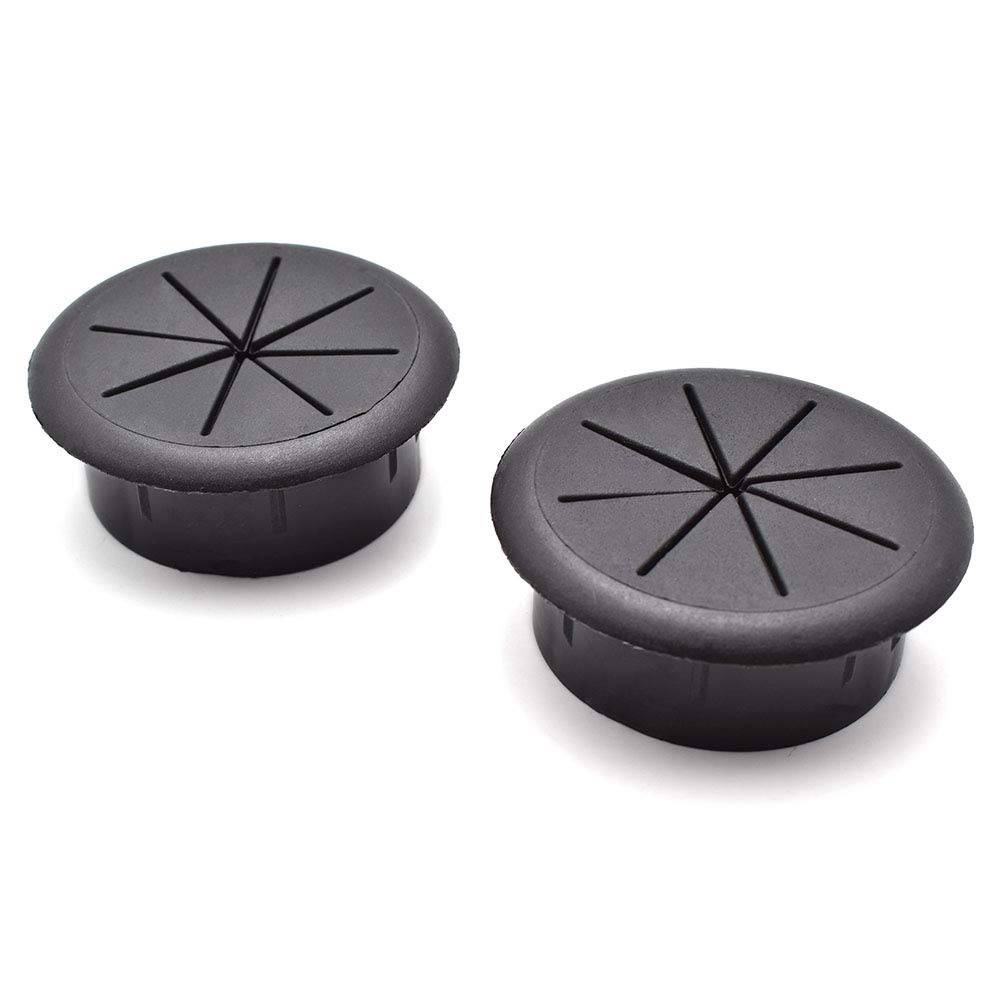
IMPORTANT: Once you have your holes cut, make sure to install the grommet’s you bought. Not only do the grommets make the holes look a lot cleaner, they are incredibly important for safety. The cut edge of the metal is really sharp and will cut through your wires or tubing and create a fire hazard.
Step 3: Install the Wire Shelves
This step is another one that’s often labeled as “optional” on other guides online for building a Milsbo Greenhouse cabinet. We do not consider this optional at all and is a large part of what makes the Milsbo Greenhouse work. Wire shelves are required for a few reasons.
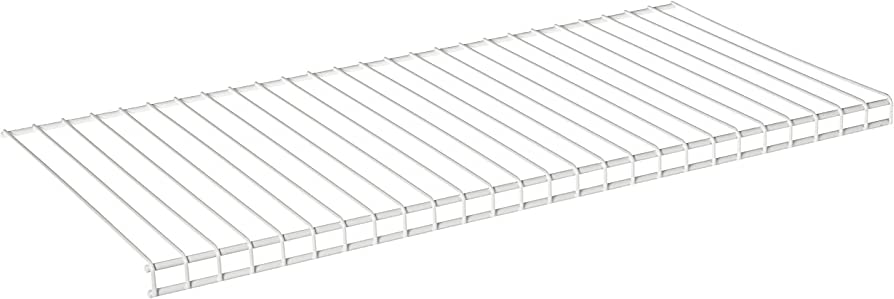
- Air Circulation: The glass shelves are tight to all four walls of the cabinet and restrict airflow. It’s significantly harder/impossible to regulate airflow and humidity with the stock glass shelves.
- Wiring/Piping: Since the glass shelves do not have any significant gaps on any of the four sides, they make it impossible to run wiring or piping through the cabinet.
We don’t consider cutting glass to eliminate these issues a reasonable solution.
Another option instead of wire shelving is to use custom acrylic shelves. However, you do pay a pretty steep premium going this route. They come as full shelves, corner shelves only, or half shelves. One other factor to keep in mind when considering acrylic shelves is that you won’t be able to use the magnetic hooks. There are still ways to support lights with magnets, it’s just slightly more difficult.
Since the wire shelves come pre-made at 12″ deep, installing them is actually pretty easy; just make sure you don’t accidentally purchase the 16″ version! It gets even easier if you buy the two pack of 26″ Rubbermaid Shelves that fit perfectly in both directions for the Milsbo cabinet. Then you don’t have to cut it at all. If you don’t buy them pre-cut to 26″, or to prefer to save a couple bucks you do have a couple of options.
Option 1: Have them cut at Home Depot/Lowes. Typically, if you grab one of the longer Rubbermaid Wire Shelves from the shelf and find an employee, they’ll help you cut it. Make sure that they cut it to 26″ and the cuts are pretty consistent!
Option 2: Buy a pair of bolt cutters and DIY. Some people say they cut these shelves with a saw, but that’s a painful process. If you thought the hole saw took a long time, this takes significantly longer and is quite the workout. If you don’t have an appropriate power tool already, a bolt cutter is a fairly cheap option to help you cut the shelves yourself and is worth having around the house regardless.
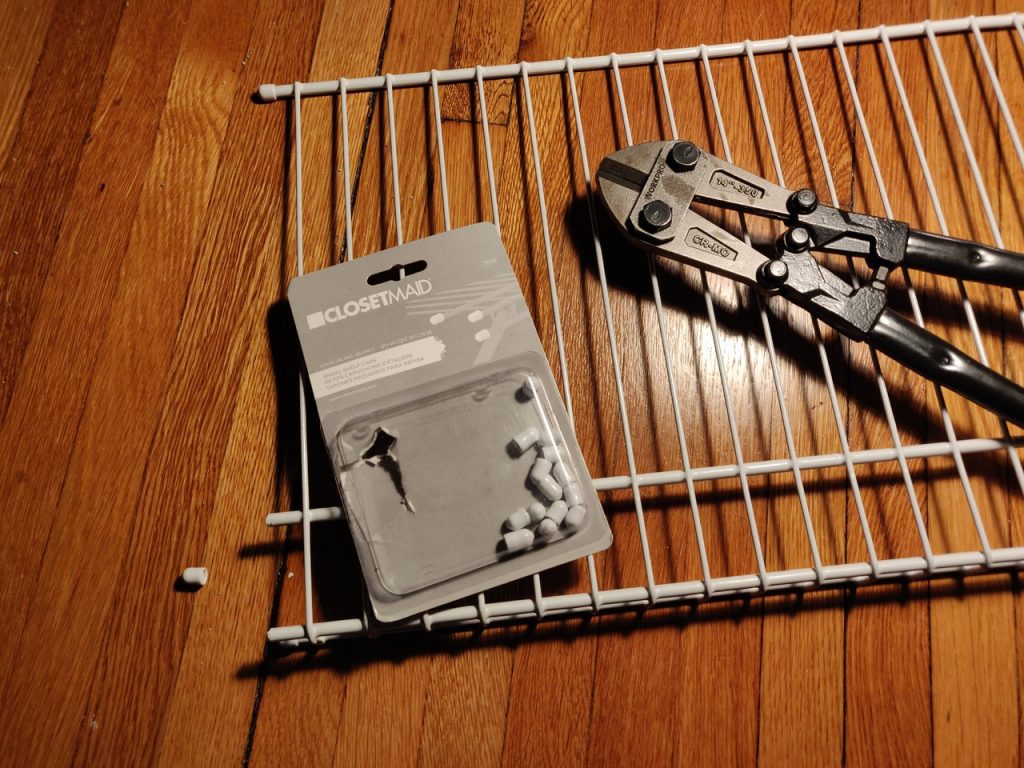
With both of these options you’ll want to get a package of rubber end caps. No matter how well you cut the metal, you won’t want that cut edge rubbing against your new glass. Keep in mind that each cut requires four caps so make sure you have enough!
Step 4: Install the L Brackets
Once you have your shelves purchased and/or cut, you need to use the L brackets to support them. The shelf supports that come with the Milsbo cabinet won’t work for the wire shelves. They aren’t deep enough to catch enough of the metal, plus they can’t accommodate the “lip” in front of the wire shelves. The L brackets give enough play that your shelf size doesn’t have to be perfect, but are beefy enough to support all of your plants or water tanks.
Once you determine the shelf height, install the rear L brackets in the Milsbo shelf holes but use the BOTTOM hole of the L bracket only (as seen below). Do this on both back corners where your shelf is going.
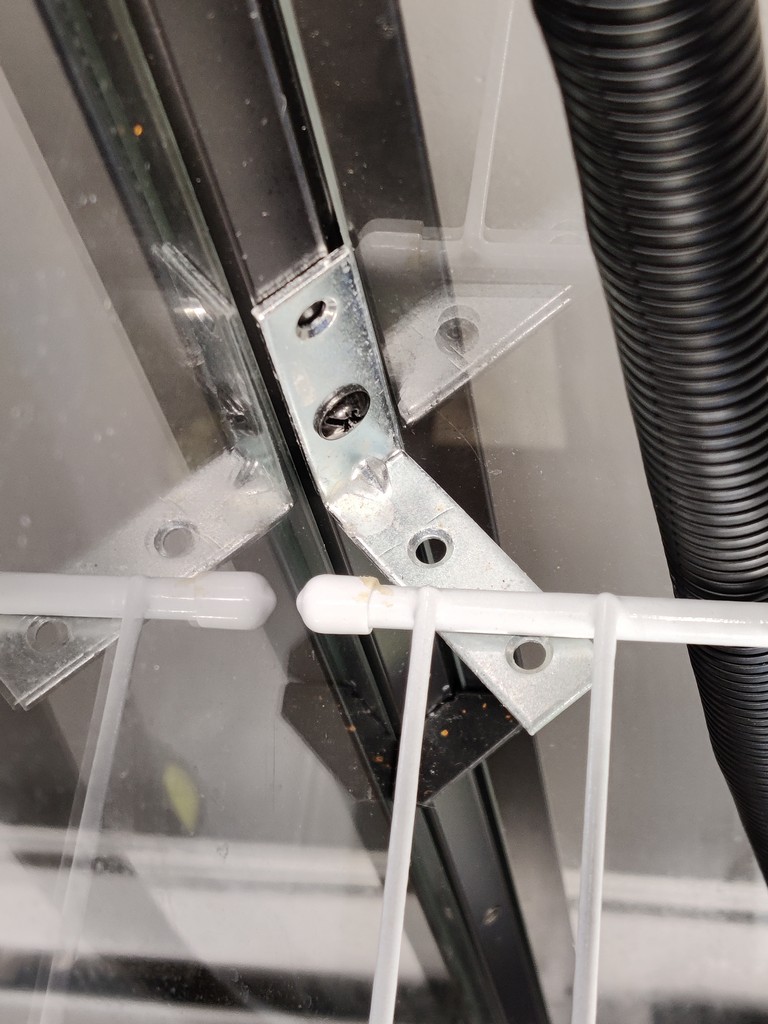
Note: We recommend using a third L bracket in the rear directly in the center to reduce the span of the shelf and help support the weight. This is especially important if you're going to be supporting a water tank for hydroponics.
On the front two brackets use the TOP hole of the L brackets instead (as seen below). This lowers the front brackets just enough that the wire shelf’s lip can sit on them and make the entire thing level.
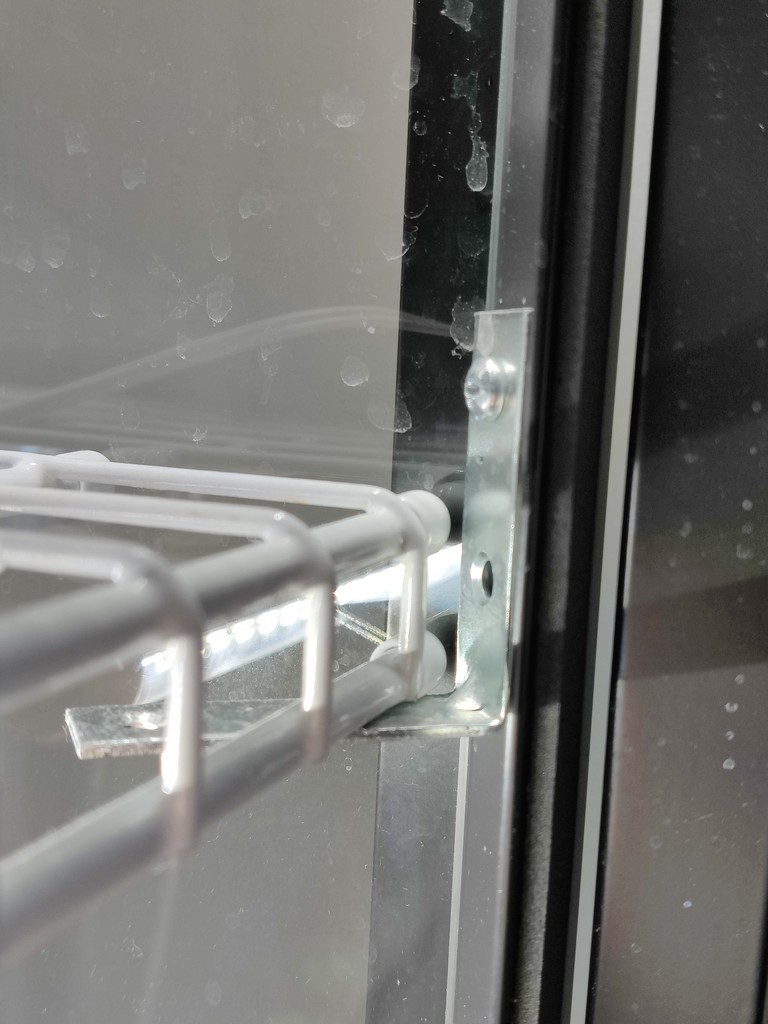
Once you have all four (or five including the center rear bracket) installed, the shelves should easily slide into place!
Step 5: Install the Lights
Now that you’ve drilled the holes and installed the shelves we can start making the Milsbo into a functioning greenhouse. Because of the metal top plate of the cabinet and the the wire shelves, we don’t need to use any screws or adhesives for our lights. Our attachments are pretty much plug-and-go thanks to to the clips that come with the Barrina-L T8 LED Grow Lights as well as our magnetic hooks we ordered.
Note: Please do not plug in the lights until they are all set up. Make sure all of them are wired and ready to go before anything has actual power to it.
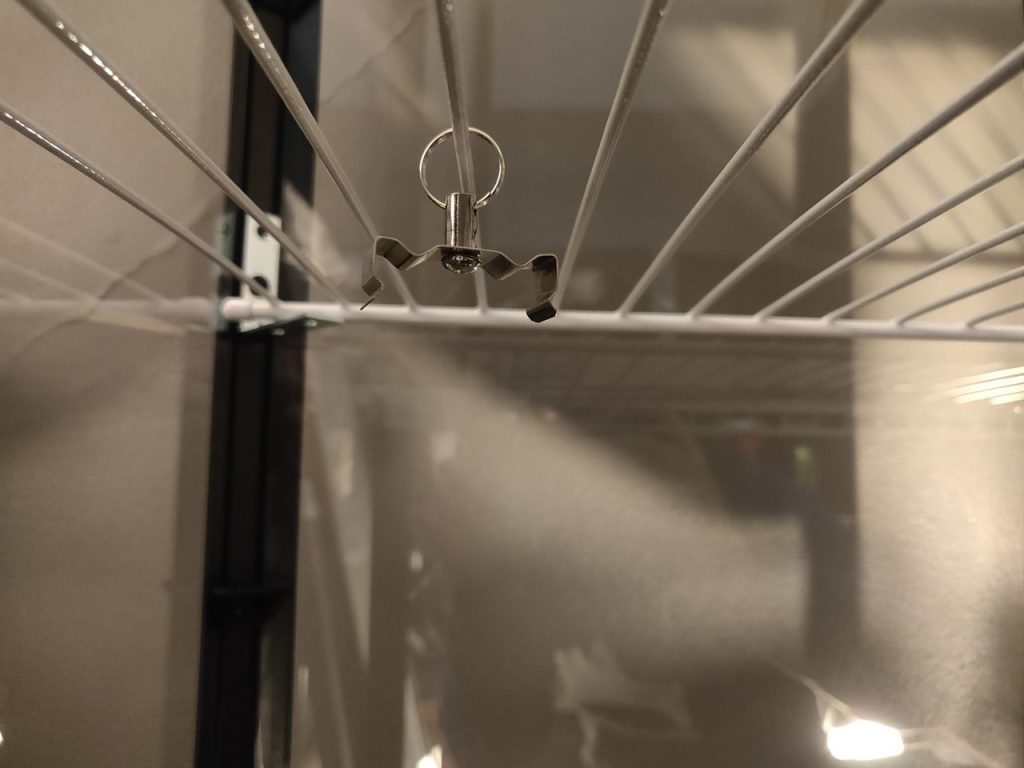
To start installing the lights, first take three of the lights and attach the included clips to the back. (You can ignore the screws since we don’t need them).
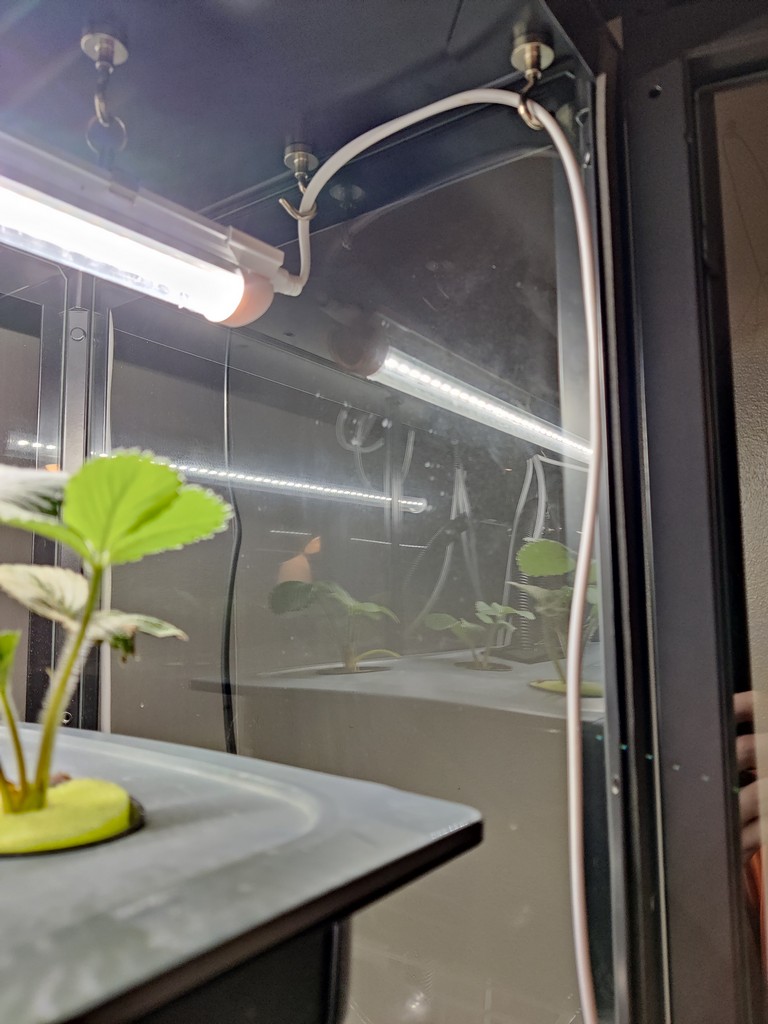
For the top light, center it above the top shelf and use the magnets fastened to the top of the cabinet to hold it in place. For the other two shelves, use the same clips but this time use the metal rings to attach them to the wire shelving instead of the magnets.
Next, plug one of the included power cords (with the switch) into the side of that light closest to your Hole 3 and feed the plug end out of the cabinet through the hole. Since our power hole (Hole 3 for Hydroponics, Hole 1 for Greenhouse) was in the top left of the cabinet, we plugged the power cord into the left side of our top light and ran it out through the top. Make sure there’s enough slack that you’re not pulling the lights one way or another with the wires.
Now that the first light has power a power cord, we need to “daisy chain” the rest of the lights together so they also have power. To do this, use the included connecting cords to link the lights together. Starting with the same light you plugged the power cord into, plug a connecting cord into the opposite end and then to the same end of the next light in the cabinet (directly above or below). Repeat this step to connect the middle light to the last light. The last light will have an empty port and doesn’t need anything else.
It’s now safe to plug in your power cord. Flip the switch to make sure you’re all hooked up properly and also to realize the T8 lights are way brighter than you thought!
Step 7: Weather-stripping your Ikea Milsbo
This is another step that people typically have a lot of questions when it comes to putting together their Ikea Milsbo Greenhouse. Some of the questions and answers are outlined below:
Is it necessary to weather strip my Ikea Milsbo Greenhouse?
Whether you should weather-strip your Ikea Milsbo is driven by what type of plants you’ll be keeping it. Some people fit out the Milsbo Greenhouse to serve as more of a plant-light shelf and less of a technical “greenhouse”. Weather-stripping doesn’t change this basic functionality of the cabinet, but it does increase the potential humidity. If you’re planning to grow a lot of plants with tropical origins, chances are pretty good that you’ll need both weather-stripping and a mini-humidifier. If you’re growing more rubust plants like Jades or Pileas that just need a light source (and a great way to display them!), then you can skip this step. It’s a pretty quick addition and can be installed even when the cabinet is full, so don’t fret over the decision too much right now.
What kind of weather-stripping should I use for the Milsbo Greenhouse?
Throughout ten different forums about Ikea Greenhouses you’ll find links to at least fifty different types of weather-stripping. Although there doesn’t seem to be a consensus, the basic premise of the weather-stripping is similar; only the doors need weather-stripping.
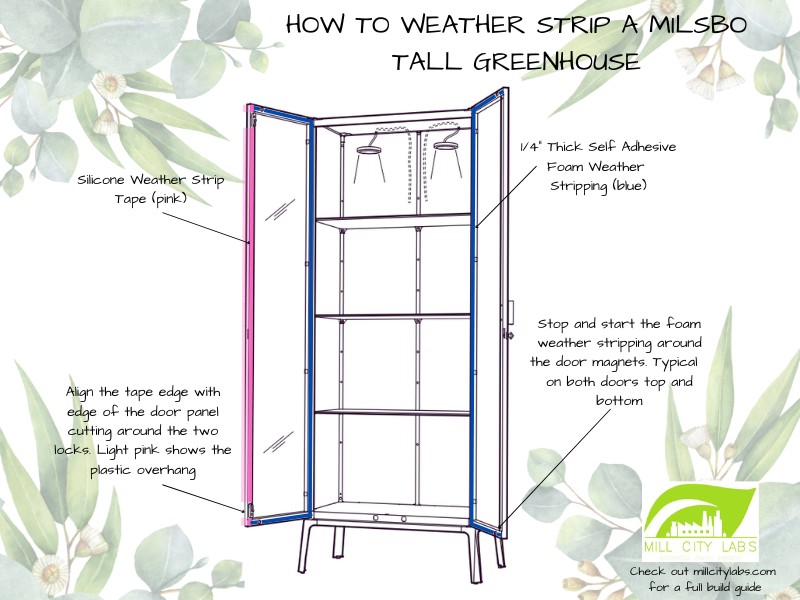
In our experience, the best way to weather strip the Milsbo cabinet is to use a 1/4″ thick self adhesive foam in conjunction with a silicone weather strip tape. The tape is used for the gap between the two doors and the 1/4″ foam is used on each other side of the door. The image below shows exactly where and how the two different weather stripping products should be installed.
Step 8: Adding the “extras”
Now that you’ve installed your wire shelves, lights, and weather stripping you have a perfectly function Ikea Milsbo greenhouse! These next couple of items before we transition into a hydroponic build are not necessary to the greenhouse, but are either quality of life improvements or visual improvements.
Smart Outlets:
Smart outlets almost shouldn’t be included in this section and should be a mandatory item. We chose to put it down here because technically you can just turn on and off your lighting every day, but with the availability and low cost of smart outlets it feels like a crime. While there are some non-wifi timer outlets you can use to simply turn on and off your lights, we are huge fans of full control through a Kasa Smart Power Strip. These things are amazing.

We’ll save the full explanation of using these for a future guide, but the short of it is that you can individually control each outlet and the USB ports remotely through automation apps. You can wirelessly turn them on/off, or do what we recommend and schedule everything to turn on and off via timers. They improve accuracy while also reducing your workload!
Humidity/Temperature:
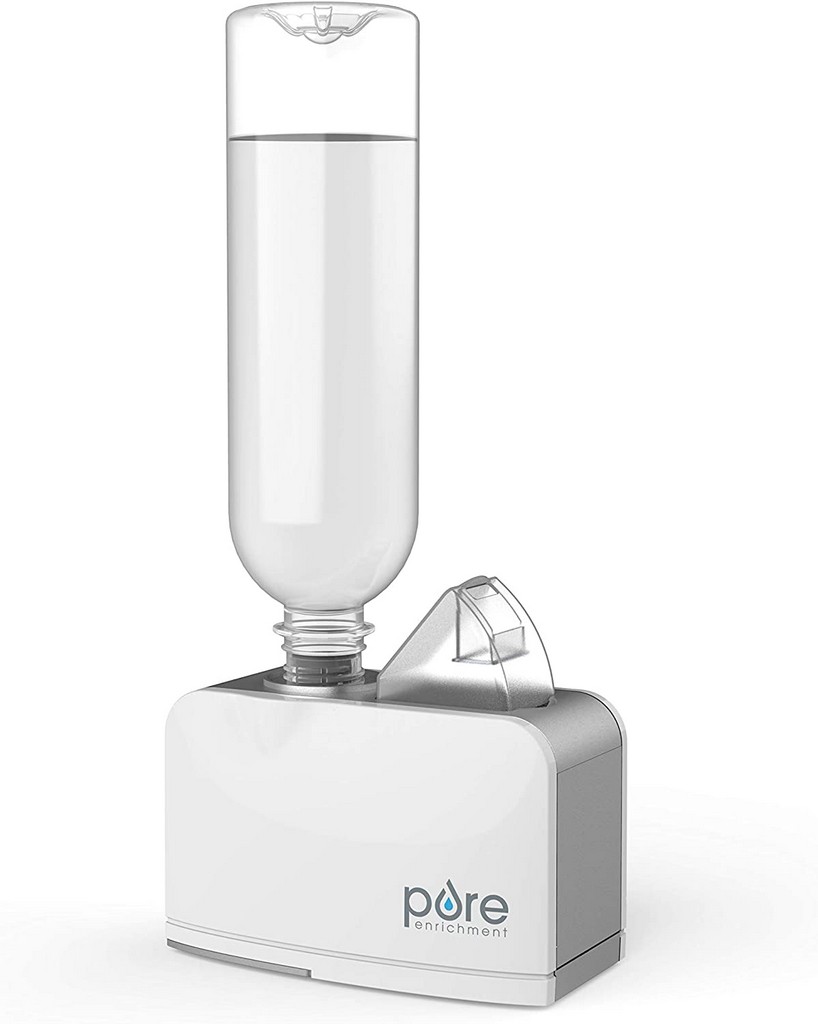
Like the weather stripping, humidity is a luxury for some and a necessity for others. If you have tropical plants that will die due to low humidity, it’s quite important that you can both monitor and regulate the humidity in your cabinet. Since we’re big into automation, we prefer to use a smart humidity sensor and a small humidifier plugged into a Kasa Smart Strip. You can use automation apps like Smart Things to turn on or off your humidifier’s outlet if the humidity reaches a certain threshold.
Our preferred humidity sensor is a Govee Wifi Sensor and a Pure Enrichment MistAire Travel Humidifier. It’s a small, consistent humidifier that doesn’t take up a lot of room saving more for our green babies.
Wire Management:
If you bought the package of magnetic hooks that we linked, you should have some extra that aren’t being used for lighting. We find that these make excellent cord-managers for the Milsbo due to its metal structure. Using these and the L brackets at each shelf, you can contain the wiring to the inside corners and make them much less noticeable.
If you want to go above and beyond you can purchase legitimate wire chases that will sit in the corner of the Milsbo and cover all of your wiring.
Step 7: Continue to Part II to convert your Milsbo Greenhouse into a Hydroponic System
Coming soon…